Who loves sloppy joes?! I do, I do!!! I absolutely love sloppy joes! There are few American beef dishes, if any, that are anywhere near as tempting as a well-made sloppy joe. After watching Rachel Ray make sloppy lou's on "Week in a Day" a few weeks ago, I absolutely had to make sloppy joes right away. This was my first attempt at homemade sloppy joes, and they were everything I wanted them to be and more. Bye bye Manwich, there's a mean sloppy joe in town, and you better make room!
Zesty Sloppy Joes
1.5 lbs ground chuck
1 onion, chopped
1 green pepper, chopped
1 garlic clove, minced
3/4 c - 1 c ketchup
1/4 c tomato paste
1 TB yellow mustard
1 tsp honey dijon or deli-style mustard
1 TB worcestershire sauce
1/4 c brown sugar
1 tsp chili powder and/or chipotle powder
1 tsp cayenne pepper
1/2 tsp paprika
1/2 tsp Lawry's seasoned salt
1 tsp Tony Chachere's or other creole seasoning blend (or use similar seasons that you blend yourself)
1 small pinch of oregano
1 dash cider vinegar
1 tsp black pepper
salt to taste
Procedure:
1. Sautee onions and green pepper.
2. Meanwhile, in a separate pan, sautee ground beef, draining off excess fat.
3. Once excess fat is drained, add in onion, green pepper, garlic cloves, dry seasoning and brown sugar. Continue cooking for about 2 minutes.
4. Add in vinegar, ketchup, tomato paste, mustards, and worcestershire sauce.
5. Continue cooking until beef is done and sauce thickens.
6. Serve on toasted sesame seed buns. For an extra indulgent sloppy joe, top with stretchy white cheese like provolone, mozz, or even leftover string cheese strips, YUM!
All-time Most Popular Posts
-
One of my favorite foods on earth is pernil, or latin style pulled pork. It's juicy, it's citrus-y, it's herby, it has the yum...
-
 Mmmmm, kaw (kaw saik jrouk) is one of my favorite Cambodian dishes. I absolutely love it's delicious caramelized yumminess! It is...
This Week's Most Popular Posts
-
 So I made Banh chao today!! It turned out perfect!! I was soo happy! Banh chao is the Cambodian version (different only in name) of the ...
 -
One of my favorite foods on earth is pernil, or latin style pulled pork. It's juicy, it's citrus-y, it's herby, it has the yum...
Monday, October 29, 2012
Sweet Smoky Spicy Chili Pineapple Salmon
Now that I am in my first year as a high school teacher, I have very little time to cook. For this first 9 weeks, grading has consumed much of my time. The more I work, the better I become at creating fast, delicious and nutritious meals in a flash. This weekend, I made a great, quick and easy salmon recipe with ingredients that I already had around the house. The result was a bold, sweet, smoky, spicy, and uniquely unforgettable meal. The spice level is just right, not too much or too little, and the sweetness of the pineapple perfectly balances the spicy chili.
I go to the Indian market once in a while to stock up on yogurt since Indian yogurt is my favorite--it's thick and creamy, yet mild in flavor, as opposed to its very sour American counterpart. Unlike so-called Greek yogurt or American-style yogurt found at the average supermarket, Indian yogurt is not thickened with gelatin, cornstarch, or other thickening agents. It is just plain dairy. On my last trip to Laxmi on old Parham Rd in Richmond, I came across a delicious-looking chili sauce by Deep, a popular Indian supermarket product brand. The sauce had a nice homemade look, so I decided to try it and find a use for it. This recipe is one of many uses that I found for it. It was also great in my mother's chicken and rice dish, which was almost like a soup, but closer to the consistency of chicken and dumplings.
Chili Pineapple Salmon
Ingredients
- 5 salmon fillets
- 1/3 c cubed fresh pineapple (cubed in about 1" or slightly smaller cubes)
- 1/3c or so Deep brand Ole fired roasted mango chili sauce (online or at local Indian market)
- 1/8c water (just enough to barely cover the bottom of the pan)
- 1 onion, thinly sliced
- 1 garlic clove, minced
- 1/2 tsp dried thyme
- 1 tsp black pepper
- 1 tsp salt
dry seasoning rub
1 tsp seasoned salt
1/2 tsp cajun seasoning (such as Tony Chachere)
black pepper to taste
salt to taste (about 1 tsp or so)
extra virgin olive oil
Procedure:
1. Preheat an oven to 425F.
2. Over medium low heat, sautee onion, pineapple, salt, and pepper in olive oil until onions are softened and transparent. A few minutes before onions are ready, about 7 minutes, add in minced garlic, thyme, and chili sauce.
3. Continue sauteeing for about 3-5 minutes, until sauce thickens. Meanwhile, lightly drizzle salmon with olive oil and sprinkle evenly with dry seasoning.
4. Place salmon in one layer in an ungreased rectangular pan. Coat the salmon evenly with pineapple chili sauce.
5. Cook salmon in oven uncovered for 10 minutes. When ready, salmon will flake easily when pulled apart with a fork.
6. Serve with Haitian rice and beans.
Variation:
Chili Pineapple Chicken Wings
1. Follow procedure above, except you season chicken well and then sear until golden brown on all sides and then set aside.
2. Make sauce, adjusting quantity according to quantity of wings.
3. Place wings in a single layer in a lined pan (sauce could potentially get sticky).
4. Pour prepared sauce evenly over wings and bake covered at 450F until fork tender.
5. Once fully cooked, removed foil and brown for a few minutes under the broiler until golden and crispy on edges.
6. Enjoy!
Tuesday, August 7, 2012
Guaranteed Creamiest, Dreamiest Grits!!!
Every good southerner loves a nice bowl of grits, whether sweet or savory. On the other hand, most people who grew up outside the south just don't get it. Being here in Virginia, right on the borderline, even many of us don't know about the deliciousness of grits when they're done just right. Sometimes, even younger generations of southerners don't get the chance to learn the tricks to those perfect grits that their parents and grandparents made. Even few restaurants get grits 100% right. Restaurant grits are often glue-y and goopy, and less than appetizing. Homemade grits that are done improperly are stiff and, well, gritty. No one wants that, ick!
This recipe is to equip you with the tools for making perfect creamy, dreamy grits! You can use this technique for either sweet or savory grits, adding in the seasoning at the same point when the sugar is added in the recipe below, in place of the sugar, of course.
Ingredients
1-1/2 c water
6 TB grits
2 tsp butter
1/2 c milk or so
about 1/3 c white granulated sugar (optional)
*for savory grits add ingredients like paprika, garlic powder, onion powder, and shredded cheddar in lieu of sugar
Procedure
1. Bring water to a boil over high heat with 2 tsp of butter, cut into small pieces to facilitate rapid melting. Gradually add in 6 TB of grits, whisking rapidly and continuously.
2. Reduce heat to low (# 2 if you have numbers), cover and simmer for 20 minutes.
3. About every 3 or 4 minutes, remove top and whisk grits to break up lumps, being sure to get any grits stuck on the sides of the pan. At this point, if you grits have absorbed most of the liquid, add in a little milk, whisk, cover, and continue simmering.
4. Repeat this process throughout cooking. Before the last 4 minutes, whisk in any remaining milk and whisk in the sugar or other seasoning. For sweet grits, around 1/3c sugar works for this amount.
5. Serve immediately. For any leftovers, if they are too dry stir in a little liquid with a fork before reheating.
Thursday, July 26, 2012
Hearty Sausage and Potatoes Frittata
Ingredients
8 large eggs
2 TB heavy cream, sour cream, or plain yogurt
half of a roll of breakfast sausage, cooked and broken apart with oil well-drained
1 potato, sliced into thin rounds and sauteed until cooked
1/2c shredded cheddar
2 TB grated parmesan
1/4 medium onion, chopped and caramelized
1 green onion, sliced
2 cloves of garlic, minced
1 TB minced fresh parsley
cayenne pepper, to taste
1 tsp paprika
1/4 tsp smoked paprika
1/4 tsp Hungarian paprika (or other ground hot pepper)
1 tsp black pepper
salt to taste (be sure to salt the eggs and the potatoes)
1 TB butter
*you can always sub slices of any sausage you like in place of the breakfast sausage.
Procedure
1. Set oven to 400F
2. Beat eggs, cream, seasoning, herbs, onions, and garlic until frothy.
3. Melt butter over medium heat in an oven-safe skillet. Place sausage and potato into the pan and pour egg mixture o top.
4. Pull the edges of the egg away from the sides of the pan with a spatula, allowing the uncooked eggs to flow to the bottom of the pan. Repeat this process until the frittata is half set.
5. Once the frittata is half set, place it in the oven for 10 minutes.
6. Remove from oven, plate, and enjoy. No need to invert since the top is the pretty side ;). Serve in slices. Refrigerate leftovers.
Thursday, July 19, 2012
Unforgettable Southern Shrimp and Grits!
I started making shrimp and grits after trying them at Richmond's undisputed soul food restaurant king, Croakers Spot. After trying my new favorite version at Lunch, Richmond's new restauarant serving up Southern homestyle food with a twist, I figured that it was time to bring the old summer favorite. Since Croakers Spot, I have made shrimp and grits at home a number of different ways--with gravy, with beer sauce, with tomato sauce, etc. This particular version has a great summer twist from the incorporation of deliciously tangy green garden tomatoes. If you don't have green tomatoes, just use red, but just know that the green makes it even more special with its delicious sweet yet tangy flavor. My shrimp and grits has a flavorful sauce with chunks of beautiful bright green and red, juicy, fresh tomatoes along with diced onion. The light freshness of the shrimp and veggies combined with the creaminess of the grits, without the gross, heavy feeling of some restaurant grits. This dish is fresh, nutritious, and bursting with flavor. It's sure to be your next family favorite!
Ingredients
*If you like leftovers or have a larger, double this recipe. It is just enough for 3 or 4 people.
1lb shrimp, peeled and deveined
1/4 c coarsely chopped onion
4 large tomatoes, in 1-1.5" chunks, preferably half green or mostly green
4 cloves of garlic + 2 cloves for marinating the shrimp
1 green onion, sliced
1/2 a light-colored beer (Corona, Coors, etc)
1 TB chopped fresh parsley
a small pinch of thyme
1c of grits (old fashioned, NOT quick cooking or instant)
2c of chicken broth (I didn't have any, so I used water and 1 pack of Goya bouillon)
1-1/2c milk (skim is just fine, that is what I used)
1-1/2c water + about 1/2c or so extra in case the grits thicken too much during cooking
1 TB secret ingrdient (don't worry, it's still great without it, but I'll keep this one a secret)
*Bear in mind that I don't actually measure the dry seasonings, add it until it's good :P*
1/2 tsp paprika
1/8 tsp cayenne pepper
1/4 tsp garlic powder
1/4 tsp onion powder
salt and pepper to taste (salt generously because grits tend to suck up flavor)
1/2c shredded cheddar cheese
Procedure
1. Place peeled, deveined, and rinsed shrimp into a medium size bowl. Sprinkle a generous amount of salt (much more than you would season them with) over all over shrimp. Toss the shrimp in the salt with your hands in a slight rubbing motion until they begin to foam slightly. Once you begin seeing small foaming or bubbles, this takes 2-3 minutes, rinse the shrimp again.
2. Once rinsed, allow the shrimp to marinade in a little salt, two cloves of minced garlic and the sliced green onion. Be sure to wipe off the marinade before cooking to avoid burning the seasoning. Simply add the remaining marinade when it is time to add the green onion.
3. Prepare the grits according to the instructions, except be sure to remove the lid and whisk the grits for a minute about 3 or 4 times during the process to create creamier, smoother grits. Be sure to add in the seasoning after initially whisking the grits into the boiling liquid. If the grits get thick, add a little water here and there. I probably added an extra half a cup of liquid by the end.
4. Once the grits are done, stir in the cheddar and continue cooking 1-2 minutes to incorporate the cheese.
5..Saute the onions in a pan over medium low heat in a generous amount of oil, about 2TB or so.
6.. Once the onions are transparent, but not yet softened, add in the green tomatoes, if you are using them. If you have red, do not add them yet. Add garlic and stir occasionally.
7. Meanwhile, in a pan over high heat that has been lightly oiled, saute shrimp for 1-2 minutes on each side. Do not overcook! Once cooked, set aside.
8. Once the onions are almost completely softened, add in the red tomatoes and thyme. Sautee for one minute or so. Add the green onion.
9. Increase the heat to medium and add in the beer. Continue sauteing until the beer has cooked off. Be sure to adjust salt and pepper as needed at this point.
10. Add the shrimp to the sauce and sautee for a minute or two.
Saturday, July 14, 2012
Ooey Gooey Cinnamon Bun Pull-Aparts**Brioche Effeuiller a la Cannelle**

*ugly, but it sure was yummy!* Sorry, I ate quite a bit long before I photographed*
*I overstuffed the pan, that's why mine was ugly.*
It's dough mania at my house these days! I've been making lots of pastries with brioche. This particular recipe uses French technique but with an American twist from a nice cinnamon sticky bun topping. The result is a cute (not-so-cute in the photo, but cute functionally :)) pull-apart roll stuffed with rum-soaked raisins, cinnamon, brown sugar, and white sugar topped with a perfectly ooey gooey, buttery brown sugar sauce on top.
Brioche itself is a soft, tender, buttery, sweeter, richly flavored bread. It is also used as the base of many traditional French pastries, or viennoisserie. This particular sweet bread, brioche effeuiller, literally "leaves or leaved," since leaf and layer are often communicated with the same word in most romance languages, but it actually means layered brioche. For this recipe, I took the rum-soaked raisins of pain aux raisins and fused a great American-style sticky bun sauce with this delicious, homey French treat! I know that you will enjoy as much as I did!
Just a note, be very careful with loading the pan. I overloaded the pan with dough, forgetting that although the risen dough in the pan still fit, the dough would rise to 1.5 times it's pre-baking size in the oven. Needless to say, my dough spilled over, and I found myself skimming the browned bread off the top and waiting forever for the interior dough to fully cook. Long story short, this recipe is for 2 loaf pans. Yours will be much prettier than mine and they won't spill over this way ;).
Brioche *for 2 loaf pans*
filling
160g of raisins, soaked in 7 TB of dark rum
1 stick of butter, softened
1-1/2c packed brown sugar
2 TB cinnamon
sauce
1 stick of butter, cut into pieces
1/2c packed brown sugar
1c white sugar
1/4c milk
3 TB cornstarch
2TB corn syrup
1 tsp vanilla
pinch of cinnamon
1 small pinch of nutmeg
Note: The original recipe uses evaporated milk with 1/4c brown sugar and 3/4c white sugar, but we didn't have any evaporated milk at the time. I had to increase this and add cinnamon and vanilla to compensate for the milk substitute and the addition of starch, which tends to mask flavor.
Procedure and Technique
1. Preheat oven to 350F.
2. Prepare dough per brioche dough instructions. Once the dough has risen a second time and been punched down. Begin rolling dough out on a floured surface. Roll the dough into a rectangle no more than 1/4" in thickness.
3. Butter the dough surface evenly with very soft butter. Once completely buttered, sprinkle evenly with the topping.
4. Begin cutting the dough lengthwise, as photographed here in the 4th row of photos. You will lose topping in the process moving the layers on top of one another, but simply replace the topping before moving to the next layer.
5. Once the dough is placed in the pan, allow it to rise for about 15 minutes. This is the perfect time period to begin making the sauce.
6. Next, place all sauce ingredients, besides the corn starch, into a sauce pot over medium heat.
7. Once the mixture is homogeneous and hot, but not yet boiling, place the cornstarch into heat-proof mug or small heat-proof bowl and mix in a couple of tablespoons of the liquid from the pot. Stir rapidly with a spoon until homogeneous and all lumps are out. Add the cornstarch liquid back into the pot and stir until homogeneous.
8. Allow mixture to boil gently 2-3 minutes, until thickened.
9. Once thickened and cooled slightly, just so that it is no longer boiling. pour generously and evenly on top of dough that has fully risen in the pan, just before baking. I like to push the sides of the bread in a bit to pour some sauce a long the sides too, it won't hurt to pull the layers themselves apart to a bit to give them some extra love as well.
10. Bake at 350 in 2 separate loaf pans *that are placed on top of a baking sheet* for about 25 minutes, or until browned and a quick check between the center layers shows that the bread is done. The baking sheet part is very important as that topping is very likely to spill over.
11. I actually inverted mine and poured more sauce before flipping over again. The actual top is where it's easiest to pull the bread apart from.
12. If you happen to overload your pan and your bread is browning too quickly without cooking enough in the center, simply cover to top loosely with foil, move the oven rack higher up, as the bottom is likely going to burn otherwise, and continue baking.
TIPS: For the brioche, you have to be sure to knead intensively the first time. If you do not, your dough will be to slack, and once you add the butter there will be no repairing this since the butter will shorten the gluten strands, thus weakening the strength of the dough and causing it to be to slack, soft, and sticky. After the first kneading, your dough should not leave bits here and there on the counter top. You should be able to roll the dough and pick up any bits and lift the ball with minimal stickiness and the dough should form a smooth, very soft, yet minimally sticky ball.
Please see the link below for dough shaping process photos
http://www.papillesetpupilles.fr/2011/10/brioche-a-effeuiller-au-sucre-et-a-la-cannelle-pull-apart-bread.html/
References
http://www.patiss.com/recette/pates/brioche.html
http://www.papillesetpupilles.fr/2011/10/brioche-a-effeuiller-au-sucre-et-a-la-cannelle-pull-apart-bread.html/
http://morebutter.wordpress.com/2008/12/25/papa-moreheads-cinnamon-rolls/
http://megsvegrecipes.blogspot.com/2005/02/ooey-gooey-cinnamon-rolls.html
Tuesday, July 10, 2012
Nicaraguan Chicken and Rice Soup *Arroz Aguado Nicaraguense* Updated

Back when was living in Miami, I made it my job to find the best places to eat on a budget. When I first moved and I didn't know anyone, I would take advantage of every Friday evening to go drive around a new area in search of restaurants to put on my list to try. I loved food that was comforting, hearty, and had that homemade flavor that reminded me of my own home here in Virginia.
In my search, I found that my absolute favorite Latin cuisine was Nicaraguan. There was just something about the heartiness of its root vegetables and soups, homemade juices, wonderfully marinated meats with rice and beans, and amazing homemade tropical juices that really made me feel at home. It was like trying new food at a friend's house. One of my favorite places to have Nicaraguan food was at one of the local fritangas, or Nicaraguan homestyle cafeterias. At any given time, fritangas are serving up 5 different dishes, plus the standard carne asada and grilled chicken with rice and beans. They also offer at least five, and as many as 10, freshly made tropical style juices. My favorite fritanga in Miami is Tortilleria Carne Asada in Sweetwater, known locally as the unofficial Little Managua.

*photo from Cesar L. on Yelp.com

*photo from Cesar L. on Yelp.com
One night after tons of studying way fewer breaks than I should've had, I headed 20 minutes out to Carne Asada, where I discovered arroz aguado. Arroz aguado translates literally to "watery rice" or "mushy rice." It is a delicious soup with chicken, rice, chayote squash, potato, tomato and lots and lots of mint, along with onion, garlic, and green pepper. I know that mint sounds a bit odd in savory food, but it completely transforms when mixed with the Nicaraguan trio, green pepper, onion, and garlic. Even if you aren't a big fan of mint, which I thought I wasn't, you will love this!
If you're wondering what arroz aguado tastes like, it has a mild tang from the citrus fruits, it has the comforting taste of a chicken soup with a tinge of tomato, and the rice creates almost a slight creaminess, then top it all off with a mild, soothing herb-y flavor that doesn't quite taste like any one particular herb. When I was in Miami, I was also battling some serious insomnia, and I can't tell you what it was, but a good bowl of arroz aguado always had me sleeping like a baby. I don't know any food like it when it comes to kicking some real insomnia butt!

Arroz Aguado
Ingredients
1 whole bone-in chicken, in pieces (as in legs, drumsticks, etc), or equivalent in legs, leave some or all skin
2 tomatoes, peeled and chopped into chunks
1 large carrot, sliced into diagonal round
2 chayote squash (in Latin markets), cubed
1 potato, cubed
1 bunch of mint (not a stem, yes, the whole bunch, stems and all)
1onion, roughly chopped
1/2 green bell pepper, roughly chopped
4 cloves of garlic, minced
bitter orange juice to taste, about 2 or 3 TB
juice of 1 lime
annatto powder, diluted in water, about 1 TB of liquid
2 cups of long grain rice, washed and rinsed
6-1/2 cups of water
salt to taste
Procedure
1. In a large pot, place the water. In the cool water, immediately add in the chicken, bell pepper, onions, and garlic. This allows the meat to release more flavor.
2. Turn heat to medium high, cover, and bring to a boil.
3. In a separate dry pan over medium low heat, toast rinsed and drained rice until fragrant and rice has taken on a slightly different hue. It will not brown. Set aside.
4. Once the meat is cooked, add in the rice, potato, carrots, mint, the lime juice and bitter orange juice. and dissolved annatto. Bring to a boil, stirring occasionally.
5. Adjust salt and bitter orange as needed. Bring to a boil, add in chayote squash and cook for another 10 minutes, or until the rice plumps and the potato is cooked.
6. Traditionally, this dish is served with fresh, thick Central American style tortillas, but it is great just as it is.
7. Enjoy! Bye bye insomnia!
References:
Monday, July 9, 2012
French Style Brioche Sweet Rolls *Pain aux Raisins*


I have never had pain aux raisins before, but I have been teaching myself to bake a number of traditional French pastries using French recipes. Pain aux raisins is soft, tender, and fluffy with a dark, golden sweetness from the rum-soaked raisins, and a nice creamy, rich creamy surprise from the custard baked into the roll. Even if you don't like raisins, you'll enjoy this special treat since the raisins are plumped and completely transformed by the rum.
This sweet treat is a very common French viennoiserie, or pastry. Viennoiserie is a class of pastry that doesn't have a true translation in English, but it encompasses things like croissants, brioche, pain aux chocolat,and pain aux raisin. These are all very elegant pastries that seem super complicated to us Americans, but in France, these are everyday pastries that are ubiquitous when it comes to bakery fare. Surprise your friends and family with this delicious, fine and elegant treat! It looks just as wonderful as it tastes!
Dough
http://www.blogger.com/blogger.g?blogID=8723226212538786428#editor/target=post;postID=9071726447115682002
After the first rising and punch down, brioche is fine for freezing. Just wrap the dough tightly in plastic and place in a freezer bag, being sure to press out all air.
Filling
Michel Roux's Pastry Cream from Pastry
6 egg yolks
1/2 c + 2TB sugar
1/4c all purpose flour
2 cups milk
1 vanilla bean, split lengthwise
*if you don't have the bean, use about 1 TB of good vanilla extract
rum soaked raisins *Kid friendly, the rum cooks out
150 g raisins (maybe about 1/2 c)
6.5 TB dark rum (my favorite for baking is Barbancourt)
Procedure
1. In a heat safe bowl, whisk together the yolks and 1/3 of the sugar until a ribbon like, or thick glossy consistency that forms a brief fold or ribbon when poured, is achieved.
2. Bring the milk, vanilla bean, and the rest of the sugar to a boil. Once a boil is reached, gradually pour the milk into the bowl with the yolk mixture, whisking continuously.
3. Return the mixture to a pan over medium heat. Cook for 2 minutes, whisking continuously.
4. Set custard aside to cool. Protect the custard from developing a skin on the top by either sifting powdered sugar over it or placing thin slices of butter over the top.
Assembly
1. Roll out the dough into a rectangle 1/3" thickness. Spread a layer of cooled custard over the dough and sprinkle the rum soaked raisins evenly across the dough. Tightly roll the dough length-wise.
2. Slice the rolls in about 2 inch thickness. You can do this either with a metal pastry cutter or by placing unflavored floss or thread under the roll and pulling each end to the opposite side to cut through the dough.
3. Place the rolls into a well-greased pan or baking sheet and allow to double in size. Brush with an egg wash of egg and 1 TB of milk. Bake at 375 until golden brown, about 15-17 minutes or so. Brush the eggs with egg wash a second time midway through baking.
Tuesday, July 3, 2012
Worth-the-Wait Perfect Pizza Crust

*sorry, the pizza was perfectly round, but mom decided to get a sample before I could snap a photo*
I found the perfect pizza crust recipe. It has nice crisp outer crust and a soft, tender interior. It cooks up beautiful and golden brown. You can make your own crust and get as creative as you like with the toppings. I just used some leftover meat, fresh herbs, black olives, shredded cheese blend, and a super easy homemade tomato sauce made from diluted tomato paste. I flavored mine up with a bit of an Asian twist using fish sauce, soy, and garlic, but you can take it whatever direction you like. There's nothing like the pride of knowing that you made every piece of your meal from scratch! There's no match for the taste either!
Pizza Crust Recipe
http://www.taste.com.au/recipes/14433/pizza+dough
Pizza Dough Kneading and Shaping Video
http://www.youtube.com/watch?v=BiyZoCTB63M
Easy Diluted Tomato Paste Pizza Sauce Recipe
http://allrecipes.com/recipe/easy-pizza-sauce-i/
Monday, June 25, 2012
Cheesy Garlic Herb Biscuits
I had a craving for some nice herby biscuits, but I wanted something that was a real biscuit, rather than a drop biscuit like Red Lobster. I also wanted biscuits that actually tasted like the herbs that were in themThis recipe makes a little over 1 dozen biscuits. You can always freeze any leftovers.
Ingredients
2c AP flour
1 TB baking powder
1 tsp salt
1/2 cup lard (or shortening or very cold butter)
3/4c buttermilk (or milk with 1 TB white vinegar, allow 1 min to sour)
1 c grated cheddar
1 TB fresh cilantro, chopped
8 sprigs of fresh chives, finely chopped (or 1 tsp of parsley)
2 tsp fresh thyme (dried tastes similar, so 1:1 ratio should be fine)
1 tsp dried rosemary, broken up between your hands
1/4 tsp dried rubbed sage
1/4 cayenne pepper
1/4 tsp mustard powder
Procedure
1. If not using buttermilk, place milk and 1 TB vinegar in a bowl and set aside. Do not stir.
2. Blend together flour, baking powder, and salt with a whisk. Set aside.
3. Cut in lard with a pastry blender or with two knives (place end-to-end and make an outward cutting motion)
4. In a separate bowl, stir together cheese and remaining spices until evenly blended. Set aside.
5. Gradually add buttermilk or buttermilk substitute to the flour mixture, gently stirring constantly with a spoon.
6. Once all flour is moistened, blend gingerly with very clean hands just until homogeneous. Minimal handling of the dough makes for more tender biscuits.
7. On a floured surface, gently pat out into a 1" thick rectangle. Sprinkle the rectangle with 1/4 of the cheese mixture.
8. Fold the dough into thirds, bringing the edges of the dough in to meet in the center. Gently press the dough out again with your hands until a rectangle with a 1" is achieved.
9. Sprinkle another quarter of the cheese mixture across the dough. Repeat filling, folding, and flattening process.
10. Once flattened the 4th time, shape biscuits with a biscuit cutter or cut into squares with a knife.
11. Bake at 450F until lightly browned, about 12-15 minutes
*Do not wiggle or slide the knife back and forth, simply press it straight down and lift. Moving the knife too much along the biscuit seals the edges and prevents proper rising and development of layers
Thursday, June 21, 2012
Eastern-North-Carolina-Inspired Vinegar BBQ Sauce
Who doesn't love a good Eastern NC style vinegar-based BBQ sauce? We had tons of pulled pork from huge pork butt around the house that I'd done tons of things with--arepas,pupusas, sopes--and I was starting to get a bit tired of it. Finally, I decided to go ahead and make a nice sauce and make a sandwich the old fashioned way.
This NC-inspired sauce is sure to be a favorite. It's tangy, spicy, and a little sweet. More than anything, let's not forget that you can make it in a flash! The two secrets to my version are a touch of ketchup, which is anything but traditional, Worcestershire, and molasses, another twist I brought in. The ketchup creates an additional layer of sweet tangy-ness, while the Worcestershire and molasses provide some added depth of flavor. A tinge of garlic flavor rounds out the great flavor of my Carolina vinegar BBQ sauce. Enjoy!
Ingredients
1 cup cider vinegar
1 generous TB red pepper flakes
2 TB brown sugar
1 tsp ketchup
1 tsp salt
1/4 tsp cayenne pepper
1/4 tsp Worcestershire sauce
1/8 tsp molasses
1/2 tsp black pepper
1 garlic clove, split (remove this once enough garlic flavor infuses into the sauce
Procedure
Place all ingredients in a non-reactive sauce pot over medium heat. Bring to a boil, stirring occasionally, to allow sugar to dissolve and flavors to blend.
Remove from heat Allow the sauce to cool to room temperature and enjoy. It's as simple as that! Since this sauce is vinegar-based it will keep well too. What more could you ask for?
*This sauce is best when stored at room temperature*
Mini Moist, Buttery Caramel Fig Cakes


*photos shown are without caramel sauce*
I was craving something sweet with a rich flavor tonight, but I didn't want to make a full-sized cake. Inspired by Hog's Head Cafe's pineapple upside down cake which is topped in a beautiful caramelized sugar syrup, I decided to bake mine flan style with a sugar syrup in the bottom of the pan. I made this recipe off the top of my head, just bearing in mind that I wanted a nice rich flavor and moist texture. I always start with one cup of flour for four ramekins and usually 1-1/2 tsp baking powder, and I went from there. When I opened the fridge for the milk, I saw the fig jam so I went for it. The result is a wonderful buttery flavored cake with a very tender crumb and a sticky glazed bottom.The flavor has a nice rich, buttery taste in the foreground and a mild, dark fig flavor in the background. Serve it inverted to display the caramelized-sugar-coated top. This recipe is perfect for four ramekins. Enjoy this deliciously delectable cake, mmm, mm, mmmmm! It would surely be a crowd leaser with a nice scoop of vanilla ice cream, and maybe even a capful of dark rum drizzled on top. In less than 30 minutes you'll be ready to go!
*of course if you want this to be a full size cake, double everything and there you'll have it*
Ingredients
1 cup flour
1-1/2 tsp baking powder
1/2 tsp salt
1/2c + 2TB milk
1/2 stick butter, melted
1/4 cup oil
1/4 cup brown sugar
1/4 cup white sugar
1 egg
1 TB dark fig spread (mine is Trader Joe's fig)
2 tsp dark rum (I prefer Barbancourt)
1/2 tsp vanilla
sugar syrup
1c brown sugar
1/4c water (or less, just enough to moisten the sugar, the goal is a thick syrup)
2 tsp dark rum (Barbancourt preferred)
dash of salt
Procedure
1. Preheat an oven to 350 degrees with a water bath pan in place.
A water bath just means that you will place a pan large enough to fit your ramekins into the oven and fill it with water after having placed it into the oven (as this avoids spills). The water bath prevents the crystallization of the caramelized sugar syrup and keeps it in liquid state.
2. Stir together flour, salt, and baking powder
3. Meanwhile, prepare caramelized sugar syrup in a sauce pan over low to medium low heat. Do not stir, swirl pan to blend ingredients then let boil until thickened
4. Immediately coat ramekins or mini pans with sugar syrup, swirling to coat generously on the sides and bottom.
5. Blend sugar with melted butter, oil, and rum
6. Alternate blending flour and milk by thirds with a spoon, starting and ending with flour
7. Stir in egg
8. Stir in fig jam and vanilla
9. Divide batter evenly into all four ungreased ramekins or mini pans
10. Bake for about 20-25 minutes, or until the center of the cake springs back when pressed
Tuesday, June 19, 2012
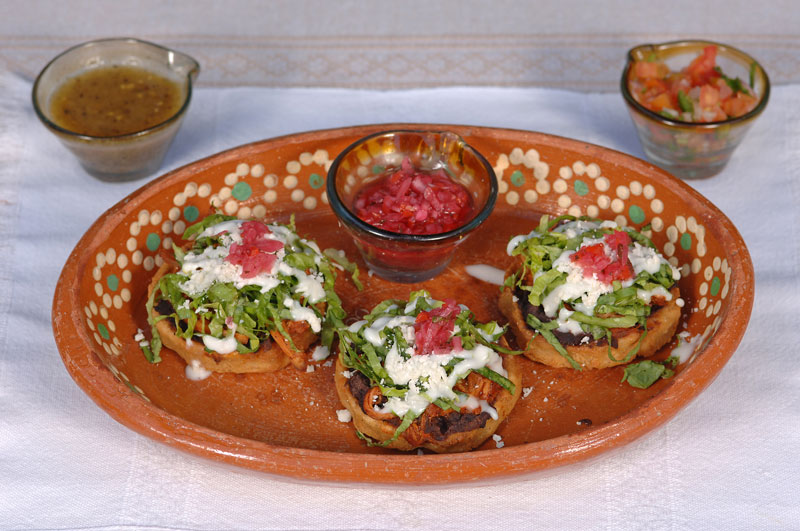
Sopes Mexicanos! Delicious Stuffed Open-Faced Fried Taco Shells


Sopes, also known as pellizcadas, migadas, or picadas, are a delicious traditional Mexican antojito, or appetizer. They are very easy to make, bursting with flavor, and full of great textural variety. The outside freshly-cooked white corn tortillas are pinched up to create shallow edges that hold in mounds of varied toppings.
Though you may not have heard of sopes before if you like tacos, tortas, or pupusas then you will love these! Try this easy, tasty snack and you and your friends and family are sure to enjoy them. Traditionally, the filling for this dish is refried beans, carne asada, chopped onion, shredded lettuce, shredded cheese, salsa roja (spicy roasted red sauce, not the kind at the store). However, to make this dish more accessible, I will provide a modified variation using ingredients easily found in your pantry.
Ingredients and Procedure
*the ingredients are broken into sections, be sure that you have noted them all*
Sopes
Maseca brand masa flour
Goya or Maggi brand chicken bouillon powder, to taste
salt to taste
1. Pour an adequate amount of Maseca flour for your desired portion into a bowl. Season with salt and chicken bouillon. use enough bouillon to lightly sprinkle over the top of your flour.
2. Prepare masa, or dough, by blending in warm water with clean hands until a soft, moist dough is formed. The dough should not be wet, just moist. Oil your hands to avoid drying of the dough and press the dough into a circle the size of the palm of your hands. These should be taco-sized tortillas, not the larger burrito-sized.
3. Cook over low heat on an ungreased pan until very gently browned on both sides.
4. Immediately press up the edges of the tortilla when still hot off of the pan. You can use parchment paper or a paper towel to aid in this process since the tortilla will be very hot.
5. Meanwhile, heat about a 1/4 of oil to medium high heat in a separate pan. If you are not making a large amount, you can use a medium sauce pot to save oil. Fry on the bottom first until golden brown, flip onto the other side and allow to fry until golden brown.
6. Pat oil on the inside and outside dry.
Meat Marinade
flank steak
fresh lime juice
fresh garlic, minced
onion (optional)
jalapeno
beer (optional)
salt
pepper
If using beer, blend all ingredients into a homogeneous liquid. Otherwise, rub blended seasoning into a paste and coat meat. Marinade for two hours. Chop into bite-sized pieces and cook well-done on a grill over charcoal or in a pan with oil over medium heat. If you have a cast-iron skillet or griddle, it would be best to use those.
refried beans
1. Coat a pan with oil in a pan over medium heat and sautee onion and garlic
2. Add washed and previously cooked or canned beans, stirring frequently and salt to taste
3. Once oil is absorbed, mash the beans with a wooden spoon or place in a blender until a paste is formed
Toppings
refried beans (I went without because I didn't have them and it was still yummy!)
marinated beef (chopped)
- I used shredded Cuban-style marinated pork since that is what I had on hand)
white or red onion, chopped or sliced
shredded mild white cheese or cheese blend, to taste
diced tomato (optional)
radish, finely sliced (optional)
fresh or store-bought salsa (pico de gallo) or tomatillo salsa (salsa verde)
1 slice of lime per person for drizzling
Assembly
1. If using, spread a spoonful of refried beans on the bottom of the fried sope
2. Top with cooked carne asada
3. Sprinkle a little raw onion
4. Top with shredded lettuce
5. Drizzle with sauce
6. Sprinkle cheese
7. Top with two to three slices of radish, if using
Enjoy!
***Source of photos:
http://www.loscabosmagazine.com/clientphotos/elcomal/pics/sopes-cochinita_7006_r2.jpg
They are not my property.
Saturday, June 2, 2012
Southern Browned Flour Gravy
My grandmother would always make a quick browned flour gravy to go along with our hoe cakes. This is a very simple gravy that does not require meat broth and tastes great with fresh, fluffy hoe cakes.
Ingredients
flour
a few TB butter
milk to reach desired texture
desired seasoning (salt, pepper, Lawry's seasoned salt, sage, rosemary, garlic cloves, onion, etc)
Procedure
1. Brown flour in an ungreased pan over medium-low heat until it reaches a color very similar to cocoa powder, a light reddish brown.
2. Once flour is browned, add in any butter that you will be using for flavoring and stir until homogeneous. Incorporate any spices at this point as well. If you are adding onion, cook until soft.
3. Gradually stir in milk until desired consistency is reached, bearing in mind that the gravy will thicken.
4. Bring the gravy to a boil for about 1-2 minutes, until thickened. If too thick, add additional milk and stir until homogeneous. Serve.
Hoe Cakes and Gravy
Growing up in a Southern family from Central Virginia, there are certain dishes that define my childhood, many of which you don't often see outside of the south--spoonbread; grits; chicken and dumplings; and my favorite, hoe cakes. My grandmother would make the family hoe cakes when we would all visit her together around dinner time on Friday nights. They were so simple and humble but to us, having never been able to get them anywhere else, they were very special. Hoe cakes were a special treat that came only from Big Mama. We'd all clamor near the stove and eat them fresh and hot, no forks or plates needed, grunting and moaning a wordless praise to this delicious taste of the old south. It was quite ironic, considering that my grandmother knew hoe cakes as undoubtedly poor man's food.
I never knew were the hoe cakes originated,but after some Googling I found that they became so named because they were originally cooked on hoes over a fire. Back then, hoes were much wider and longer. People would just clean them and cook away. I should mention, also, that hoe cakes are different things to different people. For me, hoe cakes are only the white flour, biscuit-like breads cooked on the stove top. However, I found out a few years ago that there are also corn flour hoe cakes. It appears that most people use the term to refer to the yellow corn flour cakes that are made the size of pancakes and are topped with maple syrup in the morning. I made these last month and they were amazing, especially in a cast iron pan. Some people may even know hoe cakes by other names-- (Indian) fry bread, skillet bread, or biscuit bread.
To make a long story short, I have no idea how or why this recipe died out. To be honest, I am the only person under 65, that I know of, who makes this dish. It is definitely a "foods of our grandmothers" type of thing. Just the same, it's amazing! In fact, my friend tried it today, along with my sausage gravy, and went absolutely crazy over it! I eat hoe cakes with just about anything with a gravy or meat sauce to be sopped up, but my grandmother loves making them with leftover dumpling dough when she makes chicken and dumplings. It's tons of starch, but that is her paradise.
Here is my favorite recipe. Enjoy!
Ingredients
1 cup of white flour
1-1/4 tsp baking powder
1 tsp salt
2 TB lard (or shortening)
1/2 cup buttermilk (or regular milk with 1 TB of white vinegar)
1 scant TB of butter and vegetable oil for frying
Procedure
1. Blend dry ingredients until well incorporated, 1 minute or less.
2. Cut lard into flour until fat is pea-sized. Preferable, do this with a biscuit cutter or with 2 knives
This will keep the fact cooler and more solid for optimum flaky tenderness.
3. Gradually stir in buttermilk until a soft dough is formed. If dough is wet, add extra flour.
4. Heat a pan with a mixture of vegetable oil and butter to high heat. Add just enough oil to prevent butter from burning.
5. Dust a flat surface with flour. Flatten out dough with hands into a circle that is about 1/4" in thickness. Do not leave the dough too thick as it will rise quite a bit.
6. Once pan is sizzling hot, add in dough and cover until browned and crispy. It is ok if some of the browning spots are dark. Reduce heat to medium, if necessary, bringing heat up again before next step.
7. Flip the hoe cake over. Re-oil pan before cooking other side and re-cover. This dish is not good when done on a dry pan.
8. Once browned on the outside and cooked throughout, enjoy! This dish is best when eaten fresh and hot on the same day. If you have leftovers, do not refrigerate them as they will remain more tender at room temperature.
My grandmother always makes a quick browned flour gravy to serve with our hoe cakes.
Recipe inspired by: http://www.deepsouthdish.com/2012/02/old-fashioned-biscuit-bread.html (see photo here), http://www.cheap-bastid-cooks.com/homemade-biscuits/
Thursday, May 31, 2012
Amazingly Flavorful Haitian Rice and Beans
Haitian rice and beans or Riz National (diri ak pwa) is an absolutely magical dish. Every time I make this dish for friends they go crazy over it! I don't make it often, but among those I've made it for, it is undoubtedly one of my most popular dishes. This dish is irresistible to picky eaters, dieters, even the anorexic--proven fact. If you are struggling to get someone to eat, let this one be your go-to. If you've never tried Haitian food, this is probably the best introductory dish--it's very Haitian food 101.
When I lived at the Spanish House in undergrad, I made this dish and the guys were practically fighting over it! One of them was licking his fingers and everything! Yes, it is just that good. I don't know that I've tried a more flavorful rice than this one. The smell of this dish is rich and divine. I remember I used to have a Haitian neighbor in Miami who would cook with the kitchen window open, and the smell of that rice as I walked by in the evening was so intoxicating! The cloves may sound odd, but it's really no different than the Jamaican addition of allspice (another sweet spice that Americans typically use in desserts) to their meats and rices. It just provides some added depth and richness.
Before you start, bear in mind that you must leave the hot pepper whole. It will depress and release its juices into the food during cooking, however, it is traditionally left whole for a reason. If you chop an entire scotch bonnet or habanero for this dish, it will be far too spicy and even inedible.
Ingredients
- 1 cup of long grain white rice, washed and drained
- 1 can of red beans or 1 cup precooked beans and juice, strained with juice reserved
- 3 slices thick-cut bacon (or equivalent in chopped salt pork)
- 3 cloves of garlic, minced
- 1 small onion, chopped
- 1 pack of Sazon Goya Culantro y Achiote (found in Latin foods aisle in supermarket)
- 1/2 tsp thyme
- 3 or 4 sprigs fresh parsley
- 6 whole cloves
- 1 scotch bonnet or habanero pepper (whole with stem removed. Do NOT chop. It's entirely too spicy) (half a cherry pepper with seeds is a nice substitute)
- 2 TB butter + oil to sautee veggies in and for flavoring rice.
- 3 cups water and/or bean juice (from can or from freshly cooked beans)
- salt to taste (about 1 TB)
- pepper to taste
Procedure
1. Fry bacon in a pan until crisp in a deep pan or medium pot. Crumble or chop and set aside.
2 Sautee onions in the bacon pan with butter and oil, adding garlic in toward the end to avoid burning.
3. Stir in herbs and cloves and bacon. Cook for 30 seconds to 1 minute.
4. Stir in dry seasonings and water, bean juice, and beans.
5. Bring all ingredients to a boil over medium heat. Once boiling, stir in rice and add hot pepper.
6. Boil over medium heat, stirring continuously, until water is mostly evaporated. At this point, cover and reduce to low heat. Allow to simmer 20 minutes over low heat (do not remove cover).
7. Fluff and blend rice with a fork and serve, ideally with meat and fried green plantains (banane peze).
Tuesday, May 22, 2012
Richmond Summer Food Festivals 2012
Every year, I've posted a list of some our city's greatest summer food festivals. This year, I wasn't going to do it because they are pretty much around the same time every year. Well, I've changed my mind. Of course, a handful of the festivals have already passed, but we still have much more to come. Check them out and tell me how it goes!
Shockoe Bottom Jazz Festival
May 27 - 11AM
35th Annual Greek Food Festival
Thurs May 31 - 11 AM to 9:30 PM
Friday June 1 - 11AM - 10PM
Saturday June 2 - 11A - 10PM
Sunday June 3 - 12 PM - 7PM
Stone Soul Music and Food Festival
June 2 2PM
10th Annual Vegetarian Food Festival
June 23 - 12PM - 6PM
Richmond Watermelon Festival
Sunday Aug 5, 2012
7th Annual Filipino Food Festival (funds go toward establishing Lakeside Free Clinic and various existing local charities)
Aug 10-11
Carib Culture Unity Festival
aug 25, 2012
Mini Pecan Peach Cobblers


I love summertime! One of my favorite things about summer is the abundance of fresh produce from right here in the US. It's May and delicious peaches are starting to fill displays in local supermarkets. I picked up just 3 peaches today because I wasn't liking the produce at the particular grocery store that I stopped at after a doctor's visit. I wanted peaches to eat, but they were super small and I was doubtful that they'd be the sweet, juicy peaches that I love. What to do, what do, right?
Well, I'll be moving soon so I am trying to use up everything in my cabinet, but I was not up to having a full size dessert around--ta-da individual peach cobblers : D! This recipe is perfect for a quick and easy little sweet bite after a busy day at work. This recipe makes just enough for 4 ramekins of little cobblers. This particular version of peach cobbler highlights the tangy freshness of the peaches so it has just a touch of cinnamon with a nice brightness from lemon zest. The crust is an amazing rich, buttery, mile-high crust that's almost like a super tender, airy, yet dense cake with amazing crispy edges. I hope you'll enjoy it as much as I did!

Ingredients
crust
1 cup flour
1-1/2 tsp baking powder
1/2 tsp salt
2 TB lard (or shortening or very cold butter or a mix)
1/2 c sugar (I used all Florida Crystals turbinado sugar for a nice, rich crust flavor)
1/2 cup buttermilk
1 tsp vanilla
Zest of half a lemon
1heaping TB chopped pecans
filling
4 medium peaches
zest of 1/2 lemon
about 2 TB white sugar
a light dash of cinnamon
pinch of salt (optional)
Procedure
1. Blanch peaches for 30 seconds to 1 minute to facilitate peeling. Peel peaches once cool enough to handle and slice to desired size. I chopped my slices in half lengthwise for a nice bite size.
2. Meanwhile, blend the flour with salt, sugar, baking powder, zest, and pecans. Once blended, cut the lard into the dough using a pastry blender until the fat is pea-sized. Gradually and gently stir in milk until all ingredients are moistened completely.
3. Preheat oven to 375 degrees F
4. In a pot over medium heat, place all filling ingredients and allow to cook, stirring occasionally, until peaches are softened but still have a nice bite left.
5. Spray 4 ramekins with cooking spray and divide filling among the ramekins. Top the filling with an equal amount of topping and bake for 20-25 minutes until golden brown and bubbly and dough springs back when touched. If you like more crunch, you can sprinkle extra sugar on top.
This recipe was inspired by:
http://www.skinnytaste.com/2011/10/skinny-apple-cobbler.html and http://foodwishes.blogspot.com/2011/09/crazy-basil-peach-black-pepper.html
This recipe was inspired by:
Sunday, May 20, 2012
Mmm, Mmm Zesty Sausage Gravy
Although I'm not much of a breakfast meat person, I'm such a sucker for a good sausage gravy. There's just something about that warm, delicious, comforting gravy on fluffy biscuits in the morning. Mmmm, mmm! There's nothing like it!
Traditionally, sausage gravy is seasoned with simply salt and pepper, but this is my zestier, more flavorful recipe that has a great mildly herby flavor and the perfect spicy bite.
Ingredients
3 breakfast sausage rounds (broken into bits) or the equivalent of ground sausage
1 TB minced onion
1 garlic clove, minced
3 TB butter (if your sausage does not make enough fat)
1/4 cup flour
1 cup of milk, more if you want a thinner gravy
1/8 tsp sage
1/4-1/2 tsp red pepper flakes
1/8 tsp cayenne pepper
a few dashes of smoked paprika if your sausage isn't smoky enough (optional)
salt and black pepper to taste
Procedure
1. Saute the onions over medium low heat until soft and translucent. At this point, add in the garlic until fragrant.
2. Raise the heat to medium high and add in the sausage and brown it, breaking it up into bits. Meanwhile, season it with all of the spices.
3. Once the sausage is browned and thoroughly cooked, add in the butter and allow it to melt. After the butter melts, gradually stir in flour until you achieve a homogeneous meat paste.
4. At this point, gradually add in the milk until you achieve a homogeneous gravy. Bring the gravy up to a boil and cook until it thickens, about a minute or so after it boils.
5. Enjoy over split hot biscuits or incorporate into a baked breakfast casserole.
Southern Sweet Fruit Tea
This delicious sweet tea is the perfect refreshing tea for a hot summer day. It has a beautiful fruity tang that contrasts with its sweetness.
Ingredients:
4.5 cups of water
6 tea bags
juice of 1 lemon
juice of 2 navel oranges
juice of 1 red pear (peel, puree, and strain)
Ice cubes
simple syrup
1-1/4 c sugar
1 cup water
Procedure:
1. Steep the tea bags in boiling water until all of it's strength is released--7-10 min. Be careful not to over-steep and burn the tea leaves.
2. Boil the sugar and water for the simple syrup
3. Meanwhile, juice and strain the citrus
4. Peel and chop the red pear and puree it in the blender
5. Strain the juices into a pitcher along with the cooled sugar syrup
6. Press the tea bags against the side of the pot to strain out any remaining liquid before removing the bags.
7. Allow the tea to cool (this avoids breaking the pitcher).
8. Add the tea bags and a cup of ice to the pitcher, chill, and enjoy!
Inspired by: http://www.deepsouthdish.com/2012/05/fresh-peach-sweet-iced-tea.html#more, http://www.deepsouthdish.com/2011/02/southern-fruit-iced-tea-recipe.html
Triple Cheese Beef and Pasta Casserole

This deliciously simple casserole was born of a need to clean out my cabinets before moving (can you tell?), but let me tell you, it might not be the prettiest, but it is delicious and bursting with flavor! If you're anything like me, you love hearty, comforting, one-pot meals, and this is a super all-in-one that's packed with flavor and nutrients, mmmm, mmmm! The fresh veggies and spicy bite are the icing on the cake for this tasty soon-to-be-favorite. Whether you're trying to use everything in the cabinet or looking to whip up a quick meal after work, this one is sure to please.
Let me not forget, this dish is 100% boyfriend approved. He called me after he got home and says, "Man, what was that you made? It was SO good! I should've taken some home!"

Ingredients:
1 box of pasta (I used zitti, but shells, bowties, macaroni, and other tubular pastas are fine)
1 lb ground beef
2 ears' worth of fresh corn
1 medium carrot, chopped into small cubes
1 small can of sliced olives (the short can)
1 or 2 tomatoes, peeled, seeded, and cubed
1 medium onion, diced
1/2 green bell pepper, diced
6 cloves of garlic, smashed
1 TB tomato paste
1 TB Tony Chachere's or other creole seasoning
2 tsp paprika
1/4-1/2 tsp cayenne pepper
1/2 tsp thyme
black pepper and salt to taste (you will need the meat sauce mildly on salty side before adding pasta)
generous 1/4 c + 1 rounded TB flour
1-1/4 cup milk
1/4 cup ricotta cheese
1 cup or so of cheddar and a stretchy white cheese (I happened to have shredded cheddar and a slice of provolone around)
olive oil and butter blend for sauteeing


Procedure:
Boil pasta in salt water until al dente. Bear in mind that it will not cook much in the oven. Drain pasta and coat with oil to prevent sticking. Set aside.
Sautee onions and peppers over medium heat until soft.
In a separate pan, sautee carrots until halfway done over medium heat in a 1TB or so of butter and enough oil to prevent butter from burning.
Once halfway done, add in corn and salt vegetable mix.
Add in tomatoes and garlic a few minutes before onion mix is ready. Once soft and translucent, turn heat to medium high.
Heat an oven to 400 degrees
Once pan temperature is up, add ground beef, breaking up the meat and incorporating the onion and pepper mix with a wooden spoon. Season the meat generously with all of the spices and continue stirring occasionally.
Once the meat is cooked, incorporate tomato paste and cook for a minute or so more. At this point, gradually stir in the flour to absorb all of the liquid. If more liquid remains, add more flour. Stir in the flour until you have a thick meat paste.
Once fully incorporated, gradually stir in the milk until homogeneous. Taste and adjust seasoning as necessary. Be sure to keep it slightly salty to compensate for pasta.
At this point, blend pasta, meat sauce, corn, carrots, and sliced olives in a pot or bowl. Layer the mix in a pan (I used ceramic, and I'd recommend that or glass) and place spoonfuls of ricotta throughout. Once all pasta is in pan, top with more ricotta and cover with a layer of cheese blend.
Bake for 15 minutes at 400 degrees F.
Enjoy!
*Again, sorry for not having photos, I did take them but my crazy computer's memory card drive has been damaging my cards :(*
Monday, March 19, 2012
Peanut Butter Pecan Blondies
So if you haven't figured it out yet, I love peanut butter! It gives the perfect decadent richness to so many different desserts. I had a craving for something chewy and quick that I could dress up with just a touch of peanut butter. I thought about cookies, but I've never been too big on peanut butter cookies, and I wasn't finding any twists on the typical recipe that were interesting enough for me. Peanut butter oatmeal cookies? Nope! No quick oats around. Then it came to me--if I don't want chocolate, but I want that yummy chewiness of a good, fudgey brownie, why not make a blondie? And what could be better than a peanut butter blondie? Well, not much.
Try out this recipe and see for yourself. Enjoy the perfect chewiness, the crispness of the edges, the richness added by a touch of peanut butter, and the perfect crunch and added nutty touch from chopped pecans, mmmmm, mmmm, mmm!
I modified this recipe based on the blondie recipe shared by "Whipped the Blog"
Simply follow this recipe but add in 1 TB of good quality peanut butter (I recommend Planter's) after the sugar is dissolved and before the eggs are added. Yum, oh, yum!
***These are best on the first day, but still great later. I highly recommend storing them with a slice of bread (change it daily) to retain chewiness***
***These are best on the first day, but still great later. I highly recommend storing them with a slice of bread (change it daily) to retain chewiness***
Sunday, February 19, 2012
Croque Monsieur - Baked Open-Faced French Ham and Cheese
Croque monsieur is another one of those things that I'm always hearing about on TV but have never actually tried before. It's a traditional oven baked French sandwich that is open faced with a basic white bread and layers of bechamel, cheese, and ham.
This weekend I finally decided to try my hand at making this dish for breakfast since I had two of my closest friends over. I also made the traditional pain de mie to make the bread with. I used this French recipe http://www.marmiton.org/recettes/recette_pain-de-mie_33705.aspx.
Procedure:
1. Melt butter over medium low heat. Add in minced garlic and sautee gently for 30 seconds - 1 min, or until you start to smell a light garlic scent.
2. Add in flour and stir with a whisk until homogeneous.
3. Add in the milk and seasoning and stir with whisk.
4. Raise heat to medium and stir constantly until bechamel is thickened like a gravy. (about 7 mins or so).
Bechamel Sauce - From Michel Roux's Pastry
1 TB butter
1/4 cup of flour
1 cup of milk
Sandwich Ingredients:
6 slices of bread
12 slices of quality deli ham
2/3 cup white cheese (mozzarella, provolone, or the traditional Gruyere)
1 clove of garlic, minced
a pinch of nutmeg
salt and pepper to taste
Sandwich Procedure:
1. Spread each slice of bread with an even layer of bechamel sauce
2. sprinkle an even layer of cheese over the bechamel
3. put a slice of ham on the bread (if it hangs over the side, trim it because otherwise it will dry out during cooking)
4. Cover the ham with an even layer of bechamel and sprinkle another even layer of cheese.
5. Allow to bake until the cheese is fully melted and the bread has a chance to toast.
6. Switch the oven to broil and broil for 1-2 minutes, or until the cheese is is speckled with golden brown.
7. Remove from the oven, serve and enjoy :).
Notes:
This sandwich is traditionally made with pan de mie, a basic French sandwich bread, but regular white bread will do.
Some people also do this sandwich using two slices of bread, with the final slice covered with a layer of bechamel and cheese
Photo:
http://www.odelices.com/recette/Croque-monsieur-a-la-bechamel-au-four-r1806
References:
http://www.marmiton.org/recettes/recette_croque-monsieur-a-la-sauce-bechamel_20410.aspx
http://www.marmiton.org/recettes/recette_pain-de-mie_33705.aspx
Subscribe to:
Posts (Atom)