All-time Most Popular Posts
-
One of my favorite foods on earth is pernil, or latin style pulled pork. It's juicy, it's citrus-y, it's herby, it has the yum...
-
 Mmmmm, kaw (kaw saik jrouk) is one of my favorite Cambodian dishes. I absolutely love it's delicious caramelized yumminess! It is...
This Week's Most Popular Posts
-
 So I made Banh chao today!! It turned out perfect!! I was soo happy! Banh chao is the Cambodian version (different only in name) of the ...
 -
One of my favorite foods on earth is pernil, or latin style pulled pork. It's juicy, it's citrus-y, it's herby, it has the yum...
Monday, June 25, 2012
Cheesy Garlic Herb Biscuits
I had a craving for some nice herby biscuits, but I wanted something that was a real biscuit, rather than a drop biscuit like Red Lobster. I also wanted biscuits that actually tasted like the herbs that were in themThis recipe makes a little over 1 dozen biscuits. You can always freeze any leftovers.
Ingredients
2c AP flour
1 TB baking powder
1 tsp salt
1/2 cup lard (or shortening or very cold butter)
3/4c buttermilk (or milk with 1 TB white vinegar, allow 1 min to sour)
1 c grated cheddar
1 TB fresh cilantro, chopped
8 sprigs of fresh chives, finely chopped (or 1 tsp of parsley)
2 tsp fresh thyme (dried tastes similar, so 1:1 ratio should be fine)
1 tsp dried rosemary, broken up between your hands
1/4 tsp dried rubbed sage
1/4 cayenne pepper
1/4 tsp mustard powder
Procedure
1. If not using buttermilk, place milk and 1 TB vinegar in a bowl and set aside. Do not stir.
2. Blend together flour, baking powder, and salt with a whisk. Set aside.
3. Cut in lard with a pastry blender or with two knives (place end-to-end and make an outward cutting motion)
4. In a separate bowl, stir together cheese and remaining spices until evenly blended. Set aside.
5. Gradually add buttermilk or buttermilk substitute to the flour mixture, gently stirring constantly with a spoon.
6. Once all flour is moistened, blend gingerly with very clean hands just until homogeneous. Minimal handling of the dough makes for more tender biscuits.
7. On a floured surface, gently pat out into a 1" thick rectangle. Sprinkle the rectangle with 1/4 of the cheese mixture.
8. Fold the dough into thirds, bringing the edges of the dough in to meet in the center. Gently press the dough out again with your hands until a rectangle with a 1" is achieved.
9. Sprinkle another quarter of the cheese mixture across the dough. Repeat filling, folding, and flattening process.
10. Once flattened the 4th time, shape biscuits with a biscuit cutter or cut into squares with a knife.
11. Bake at 450F until lightly browned, about 12-15 minutes
*Do not wiggle or slide the knife back and forth, simply press it straight down and lift. Moving the knife too much along the biscuit seals the edges and prevents proper rising and development of layers
Thursday, June 21, 2012
Eastern-North-Carolina-Inspired Vinegar BBQ Sauce
Who doesn't love a good Eastern NC style vinegar-based BBQ sauce? We had tons of pulled pork from huge pork butt around the house that I'd done tons of things with--arepas,pupusas, sopes--and I was starting to get a bit tired of it. Finally, I decided to go ahead and make a nice sauce and make a sandwich the old fashioned way.
This NC-inspired sauce is sure to be a favorite. It's tangy, spicy, and a little sweet. More than anything, let's not forget that you can make it in a flash! The two secrets to my version are a touch of ketchup, which is anything but traditional, Worcestershire, and molasses, another twist I brought in. The ketchup creates an additional layer of sweet tangy-ness, while the Worcestershire and molasses provide some added depth of flavor. A tinge of garlic flavor rounds out the great flavor of my Carolina vinegar BBQ sauce. Enjoy!
Ingredients
1 cup cider vinegar
1 generous TB red pepper flakes
2 TB brown sugar
1 tsp ketchup
1 tsp salt
1/4 tsp cayenne pepper
1/4 tsp Worcestershire sauce
1/8 tsp molasses
1/2 tsp black pepper
1 garlic clove, split (remove this once enough garlic flavor infuses into the sauce
Procedure
Place all ingredients in a non-reactive sauce pot over medium heat. Bring to a boil, stirring occasionally, to allow sugar to dissolve and flavors to blend.
Remove from heat Allow the sauce to cool to room temperature and enjoy. It's as simple as that! Since this sauce is vinegar-based it will keep well too. What more could you ask for?
*This sauce is best when stored at room temperature*
Mini Moist, Buttery Caramel Fig Cakes


*photos shown are without caramel sauce*
I was craving something sweet with a rich flavor tonight, but I didn't want to make a full-sized cake. Inspired by Hog's Head Cafe's pineapple upside down cake which is topped in a beautiful caramelized sugar syrup, I decided to bake mine flan style with a sugar syrup in the bottom of the pan. I made this recipe off the top of my head, just bearing in mind that I wanted a nice rich flavor and moist texture. I always start with one cup of flour for four ramekins and usually 1-1/2 tsp baking powder, and I went from there. When I opened the fridge for the milk, I saw the fig jam so I went for it. The result is a wonderful buttery flavored cake with a very tender crumb and a sticky glazed bottom.The flavor has a nice rich, buttery taste in the foreground and a mild, dark fig flavor in the background. Serve it inverted to display the caramelized-sugar-coated top. This recipe is perfect for four ramekins. Enjoy this deliciously delectable cake, mmm, mm, mmmmm! It would surely be a crowd leaser with a nice scoop of vanilla ice cream, and maybe even a capful of dark rum drizzled on top. In less than 30 minutes you'll be ready to go!
*of course if you want this to be a full size cake, double everything and there you'll have it*
Ingredients
1 cup flour
1-1/2 tsp baking powder
1/2 tsp salt
1/2c + 2TB milk
1/2 stick butter, melted
1/4 cup oil
1/4 cup brown sugar
1/4 cup white sugar
1 egg
1 TB dark fig spread (mine is Trader Joe's fig)
2 tsp dark rum (I prefer Barbancourt)
1/2 tsp vanilla
sugar syrup
1c brown sugar
1/4c water (or less, just enough to moisten the sugar, the goal is a thick syrup)
2 tsp dark rum (Barbancourt preferred)
dash of salt
Procedure
1. Preheat an oven to 350 degrees with a water bath pan in place.
A water bath just means that you will place a pan large enough to fit your ramekins into the oven and fill it with water after having placed it into the oven (as this avoids spills). The water bath prevents the crystallization of the caramelized sugar syrup and keeps it in liquid state.
2. Stir together flour, salt, and baking powder
3. Meanwhile, prepare caramelized sugar syrup in a sauce pan over low to medium low heat. Do not stir, swirl pan to blend ingredients then let boil until thickened
4. Immediately coat ramekins or mini pans with sugar syrup, swirling to coat generously on the sides and bottom.
5. Blend sugar with melted butter, oil, and rum
6. Alternate blending flour and milk by thirds with a spoon, starting and ending with flour
7. Stir in egg
8. Stir in fig jam and vanilla
9. Divide batter evenly into all four ungreased ramekins or mini pans
10. Bake for about 20-25 minutes, or until the center of the cake springs back when pressed
Tuesday, June 19, 2012
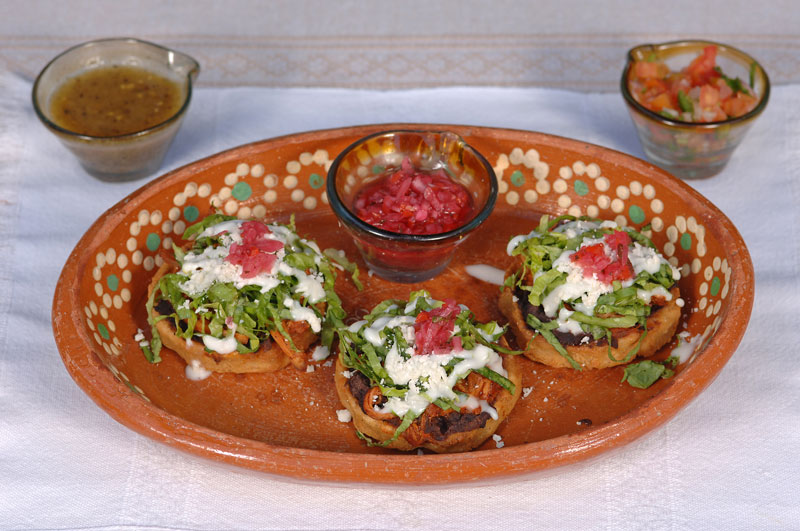
Sopes Mexicanos! Delicious Stuffed Open-Faced Fried Taco Shells


Sopes, also known as pellizcadas, migadas, or picadas, are a delicious traditional Mexican antojito, or appetizer. They are very easy to make, bursting with flavor, and full of great textural variety. The outside freshly-cooked white corn tortillas are pinched up to create shallow edges that hold in mounds of varied toppings.
Though you may not have heard of sopes before if you like tacos, tortas, or pupusas then you will love these! Try this easy, tasty snack and you and your friends and family are sure to enjoy them. Traditionally, the filling for this dish is refried beans, carne asada, chopped onion, shredded lettuce, shredded cheese, salsa roja (spicy roasted red sauce, not the kind at the store). However, to make this dish more accessible, I will provide a modified variation using ingredients easily found in your pantry.
Ingredients and Procedure
*the ingredients are broken into sections, be sure that you have noted them all*
Sopes
Maseca brand masa flour
Goya or Maggi brand chicken bouillon powder, to taste
salt to taste
1. Pour an adequate amount of Maseca flour for your desired portion into a bowl. Season with salt and chicken bouillon. use enough bouillon to lightly sprinkle over the top of your flour.
2. Prepare masa, or dough, by blending in warm water with clean hands until a soft, moist dough is formed. The dough should not be wet, just moist. Oil your hands to avoid drying of the dough and press the dough into a circle the size of the palm of your hands. These should be taco-sized tortillas, not the larger burrito-sized.
3. Cook over low heat on an ungreased pan until very gently browned on both sides.
4. Immediately press up the edges of the tortilla when still hot off of the pan. You can use parchment paper or a paper towel to aid in this process since the tortilla will be very hot.
5. Meanwhile, heat about a 1/4 of oil to medium high heat in a separate pan. If you are not making a large amount, you can use a medium sauce pot to save oil. Fry on the bottom first until golden brown, flip onto the other side and allow to fry until golden brown.
6. Pat oil on the inside and outside dry.
Meat Marinade
flank steak
fresh lime juice
fresh garlic, minced
onion (optional)
jalapeno
beer (optional)
salt
pepper
If using beer, blend all ingredients into a homogeneous liquid. Otherwise, rub blended seasoning into a paste and coat meat. Marinade for two hours. Chop into bite-sized pieces and cook well-done on a grill over charcoal or in a pan with oil over medium heat. If you have a cast-iron skillet or griddle, it would be best to use those.
refried beans
1. Coat a pan with oil in a pan over medium heat and sautee onion and garlic
2. Add washed and previously cooked or canned beans, stirring frequently and salt to taste
3. Once oil is absorbed, mash the beans with a wooden spoon or place in a blender until a paste is formed
Toppings
refried beans (I went without because I didn't have them and it was still yummy!)
marinated beef (chopped)
- I used shredded Cuban-style marinated pork since that is what I had on hand)
white or red onion, chopped or sliced
shredded mild white cheese or cheese blend, to taste
diced tomato (optional)
radish, finely sliced (optional)
fresh or store-bought salsa (pico de gallo) or tomatillo salsa (salsa verde)
1 slice of lime per person for drizzling
Assembly
1. If using, spread a spoonful of refried beans on the bottom of the fried sope
2. Top with cooked carne asada
3. Sprinkle a little raw onion
4. Top with shredded lettuce
5. Drizzle with sauce
6. Sprinkle cheese
7. Top with two to three slices of radish, if using
Enjoy!
***Source of photos:
http://www.loscabosmagazine.com/clientphotos/elcomal/pics/sopes-cochinita_7006_r2.jpg
They are not my property.
Saturday, June 2, 2012
Southern Browned Flour Gravy
My grandmother would always make a quick browned flour gravy to go along with our hoe cakes. This is a very simple gravy that does not require meat broth and tastes great with fresh, fluffy hoe cakes.
Ingredients
flour
a few TB butter
milk to reach desired texture
desired seasoning (salt, pepper, Lawry's seasoned salt, sage, rosemary, garlic cloves, onion, etc)
Procedure
1. Brown flour in an ungreased pan over medium-low heat until it reaches a color very similar to cocoa powder, a light reddish brown.
2. Once flour is browned, add in any butter that you will be using for flavoring and stir until homogeneous. Incorporate any spices at this point as well. If you are adding onion, cook until soft.
3. Gradually stir in milk until desired consistency is reached, bearing in mind that the gravy will thicken.
4. Bring the gravy to a boil for about 1-2 minutes, until thickened. If too thick, add additional milk and stir until homogeneous. Serve.
Hoe Cakes and Gravy
Growing up in a Southern family from Central Virginia, there are certain dishes that define my childhood, many of which you don't often see outside of the south--spoonbread; grits; chicken and dumplings; and my favorite, hoe cakes. My grandmother would make the family hoe cakes when we would all visit her together around dinner time on Friday nights. They were so simple and humble but to us, having never been able to get them anywhere else, they were very special. Hoe cakes were a special treat that came only from Big Mama. We'd all clamor near the stove and eat them fresh and hot, no forks or plates needed, grunting and moaning a wordless praise to this delicious taste of the old south. It was quite ironic, considering that my grandmother knew hoe cakes as undoubtedly poor man's food.
I never knew were the hoe cakes originated,but after some Googling I found that they became so named because they were originally cooked on hoes over a fire. Back then, hoes were much wider and longer. People would just clean them and cook away. I should mention, also, that hoe cakes are different things to different people. For me, hoe cakes are only the white flour, biscuit-like breads cooked on the stove top. However, I found out a few years ago that there are also corn flour hoe cakes. It appears that most people use the term to refer to the yellow corn flour cakes that are made the size of pancakes and are topped with maple syrup in the morning. I made these last month and they were amazing, especially in a cast iron pan. Some people may even know hoe cakes by other names-- (Indian) fry bread, skillet bread, or biscuit bread.
To make a long story short, I have no idea how or why this recipe died out. To be honest, I am the only person under 65, that I know of, who makes this dish. It is definitely a "foods of our grandmothers" type of thing. Just the same, it's amazing! In fact, my friend tried it today, along with my sausage gravy, and went absolutely crazy over it! I eat hoe cakes with just about anything with a gravy or meat sauce to be sopped up, but my grandmother loves making them with leftover dumpling dough when she makes chicken and dumplings. It's tons of starch, but that is her paradise.
Here is my favorite recipe. Enjoy!
Ingredients
1 cup of white flour
1-1/4 tsp baking powder
1 tsp salt
2 TB lard (or shortening)
1/2 cup buttermilk (or regular milk with 1 TB of white vinegar)
1 scant TB of butter and vegetable oil for frying
Procedure
1. Blend dry ingredients until well incorporated, 1 minute or less.
2. Cut lard into flour until fat is pea-sized. Preferable, do this with a biscuit cutter or with 2 knives
This will keep the fact cooler and more solid for optimum flaky tenderness.
3. Gradually stir in buttermilk until a soft dough is formed. If dough is wet, add extra flour.
4. Heat a pan with a mixture of vegetable oil and butter to high heat. Add just enough oil to prevent butter from burning.
5. Dust a flat surface with flour. Flatten out dough with hands into a circle that is about 1/4" in thickness. Do not leave the dough too thick as it will rise quite a bit.
6. Once pan is sizzling hot, add in dough and cover until browned and crispy. It is ok if some of the browning spots are dark. Reduce heat to medium, if necessary, bringing heat up again before next step.
7. Flip the hoe cake over. Re-oil pan before cooking other side and re-cover. This dish is not good when done on a dry pan.
8. Once browned on the outside and cooked throughout, enjoy! This dish is best when eaten fresh and hot on the same day. If you have leftovers, do not refrigerate them as they will remain more tender at room temperature.
My grandmother always makes a quick browned flour gravy to serve with our hoe cakes.
Recipe inspired by: http://www.deepsouthdish.com/2012/02/old-fashioned-biscuit-bread.html (see photo here), http://www.cheap-bastid-cooks.com/homemade-biscuits/
Subscribe to:
Posts (Atom)